

with pandas, you’ve probably stumbled on this classic confusion: should you use loc or iloc to extract data? At first glance, they look almost identical. Both are used to slice, filter, and retrieve rows or columns from a DataFrame — yet one tiny difference in how they work can completely change your results (or throw an error that leaves you scratching your head).
I remember the first time I tried selecting a row with df.loc[0] and wondered why it didn’t work. The reason? Pandas doesn’t always “think” in terms of positions — sometimes it uses labels. That’s where the loc vs iloc distinction comes in.
In this article, I’ll walk through a simple mini project using a small student performance dataset. By the end, you’ll not only understand the difference between loc and iloc, but also know exactly when to use each in your own data analysis.
Introducing the dataset
The dataset comes from ChatGPT. It contains some basic student exam score records. Here’s a snapshot of our dataset
import pandas as pd
df = pd.read_csv(‘student_scores.csv’)
df
Output:
I’ll try to perform some data extraction tasks using loc and iloc, like
- Extracting a single row from the DataFrame
- Extracting a single value
- Extracting multiple rows
- Slicing a range of rows
- Extracting specific columns and
Boolean Filtering
First, let me briefly explain what loc and iloc are in Pandas.
What is loc and iloc
Loc and iloc are data extraction techniques in Pandas. They are quite helpful for selecting data from records.
Loc uses labels to retrieve records from a DataFrame, so I find it easier to use. Iloc, however, are helpful for a more precise retrieval of records, because iloc selects data based on the integer positions of the rows and columns, similar to how you would index a Python list or array.
But if you’re like me, you might be wondering. If loc is clearly easier because of row labels, why bother using iloc? Why bother trying to figure out row indexes, especially if you’re dealing with large datasets? Here are a couple of reasons.
- A lot of times, datasets don’t come with neat row indexes (like 101, 102, …). Instead, you have a plain index (
0, 1, 2, …), or you might misspell row labelling when retrieving records. In this case, you’re better off using iloc. Later in this article, it’s something we’ll be addressing also. - In some scenarios, like machine learning preprocessing, labels don’t really matter. You only care about a snapshot of the data. For instance, the first or last three records. iloc is really helpful in this scenario.
ilocmakes the code shorter and less fragile, especially if labels change, which could break your machine learning model - A lot of datasets have duplicate row labels. In this case,
ilocalways works since positions are unique. - The bottom line is, use loc when your dataset has clear, meaningful labels and you want your code to be readable.
- Use iloc when you need position-based control, or when labels are missing/messy.
Now that I’ve cleared the air, here’s the basic syntax for loc and iloc below:
df.loc[rows, columns]
df.iloc[rows, columns]
The syntax is pretty much the same. With this syntax, let’s try to retrieve some records using loc and iloc.
Extracting a single row from the DataFrame
To make a proper demonstration, let’s first change the column index and make it student_id. Currently, pandas is auto-indexing:
# setting student_id as index
df.set_index('student_id', inplace=True)
Here’s the output:

Looks better. Now, let’s try to retrieve all of Bob’s records. Here’s how to approach that using loc:
df.loc[102]All I’m doing here is specifying the row label. This should retrieve all of Bob’s records.
Here’s the output:
name   Bob
math    58
english 64
science 70
Name: 102, dtype: object
The cool thing about this is that I can drill down, kinda like a hierarchy. For instance, let’s try to retrieve specific info about Bob, like his score on math.
df.loc[102, ‘math’]The output would be 58.
Now let’s try this using iloc. If you’re familiar with lists and arrays, indexing always starts at 0. So if I want to retrieve the first record in the DataFrame, I’ll have to specify the index 0. In this case, I’m trying to retrieve Bob, which is the second row in our DataFrame — so, in this case, the index would be 1.
df.iloc[1]We’d get the same output as above:
name   Bob
math    58
english 64
science 70
Name: 102, dtype: object
And if I try to drill down and retrieve the math score of Bob. Our index would also be 1, given that math is on the second row
df.iloc[1, 1]The output would be 58.
Alright, I can wrap this article up here, but loc and iloc offer some more impressive features. Let’s speed-run through some of them.
Extract Multiple Rows (Specific Students)
Pandas allows you to retrieve multiple rows using loc and iloc. I’m gonna make a demonstration by retrieving the records of multiple students. In this case, instead of storing a single value in our loc/iloc method, we’d be storing a list. Here’s how you can do that with loc:
# Alice, Charlie and Edward's records
df.loc[[101, 103, 105]]
Here’s the output:

And here’s how to do that with iloc:
df.iloc[[0, 2, 4]]We’d get the same output:

I hope you’re getting the hang of it.
Slice a Range of Rows
Another helpful feature Python Pandas offers is the ability to slice a range of rows. Here, you can specify your start and end position. Here’s the syntax for loc/iloc slicing:
df.loc[start_label:end_label]In loc, however, the end label would be included in the output — quite different from the default Python slicing.
The syntax is the same for iloc, with the exception that the end label would be excluded from the output (just like the default Python slicing).
Let’s walk through an example:
I’m trying to retrieve a range of students’ records. Let’s try that using loc:
df.loc[101:103]Output:

As you can see above, the end label is included in the result. Now, let’s try that using iloc. If you recall, the first row index would be 0, which would mean the third row would be 2.
df.iloc[0:3]Output:

Here, the third row is excluded. But if you’re like me (someone who questions things a lot), you might be wondering, why would you want the last row to be excluded? In what scenarios would that be helpful? What if I told you it actually makes your life easier? Let’s clear that up real quick.
Assuming you want to process your DataFrame in chunks of 100 rows each.
If slicing were inclusive, you’d have to do some awkward math to avoid repeating the last row.
But because slicing is exclusive at the end, you can do this quite easily, like so.
df.iloc[0:100] # first 100 rows
df.iloc[100:200] # next 100 rows
df.iloc[200:300] # next 100 rows
Here, there will be no overlaps, and there will be consistent chunk sizes. Another reason is how it’s similar to how ranges work in Pandas. Usually, when you want to retrieve a range of rows, it also starts at 0 and doesn’t include the last row. Having this same logic in iloc slicing is really helpful, especially when you’re working on some web scraping or looping through a range of rows.
Extract Specific Columns (Subjects)
I’d also love to introduce you to the colon : sign. This allows you to retrieve all records in your DataFrame using loc. Similar to the * in SQL. The cool thing about this is that you can filter and extract a subset of columns.
This is usually where I find myself starting. I use it to get an overview of a particular dataset. From there, I can start to filter and drill down. Let me show you what I mean.
Let’s retrieve all records:
df.loc[:]Output:

From here, I can extract specific columns like so. With loc:
df.loc[:, [‘math’, ‘science’]]Output:

With iloc:
df.iloc[:, [2, 4]]The output would be the same.
I love this feature because it’s so flexible. Let’s say I want to retrieve Alice and Bob’s math and science scores. It’ll go something like this. I can just specify the range of records and columns I want.
With loc:
df.loc[101:103, ['name', 'math', 'science']]Output:

With iloc:
df.iloc[0:3, [0, 1, 3]]We’d get the same output.
Boolean Filtering (Who scored above 80 in Math?)
The final feature I want to share with you is Boolean filtering. This allows for a more flexible extraction. Let’s say I want to retrieve the records of students who scored above 80 in Math. Usually, in SQL, you’ll have to use the WHERE and HAVING clauses. Python makes this so easy.
# Students with Math > 80.
df.loc[df['math'] > 80]
Output:

You can also filter on multiple conditions using the AND(&), OR(|), and NOT(~) operators. For instance:
# Math > 70 and Science > 80
df.loc[(df[‘math’] > 70) & (df[‘science’] > 80)]
Output: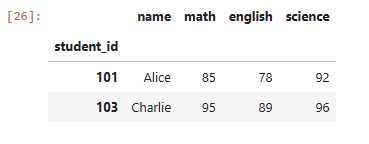 P.S. I wrote an article on filtering with Pandas. You can read it here
Usually, you’ll find yourself using this feature with loc. It can get a bit complicated with iloc, as it doesn’t support Boolean conditions. To do this with iloc, you’ll have to convert the Boolean filtering into a list, like so:
# Students with Math > 80.
df.iloc[list(df['math'] > 80)]
To avoid the headache, just go with loc.
Conclusion
You’ll probably use the loc and iloc methods a lot when you’re working on a dataset. So it’s crucial to know how they work and distinguish the two. I love how easy and flexible it is to extract records with these methods. Whenever you’re confused, just remember loc is all about labels while iloc is about positions.
I hope you found this article helpful. Try running these examples on your own dataset to see the difference in action.
I write these articles as a way to test and strengthen my own understanding of technical concepts — and to share what I’m learning with others who might be on the same path. Feel free to share with others. Let’s learn and grow together. Cheers!
Feel free to say hi on any of these platforms